WordPress Emails Stopped Sending? It’s normally not fun and much times it is too late as communications have already been lost and much chaos can arise. I hope this brief tutorial might be able to help you resolve your WordPress email issues.
If your WordPress emails stopped sending (abruptly or never worked) and are experiencing any of the following:
- WordPress forms stop sending emails. Emails are not being received from any WordPress forms.
- Gravity Forms, Contact Form 7 or other similar email form Plugins stopped sending notification emails.
- Bypassing WordPress mailer using an SMTP plugin is still failing and not resolving the problem.
- Email forms stop working all of a sudden! For example a contact form is no longer sending the email.
Let’s determine the source of problem. It’s not WordPress. It’s not WordPress. Let’s make sure that is clear. Blaming WordPress for this issue is like blaming a lake for a flat tire. WordPress is doing exactly what it is supposed to do in regards to how it natively handles emails. Even if you are using an SMTP Plugin to bypass the standard WordPress Mailer, it’s still not WordPress.
The true problem is not a bug or software issue. It is simply how a server and/or 3rd party email services handle emails – such as: BlueHost, Hostgator, Gmail, Microsoft Office 365 Mail, Yahoo or other similar. As we all know, email has been abused since the beginning of widespread internet use, and all creditable email services and providers have taken great lengths to prevent SPAM and other abusive email practices. This is a good thing!
There are generally a few actions that need to be carried out to get email working again. And sometimes only one will resolve it. There are obviously other complexities that can arise that are beyond the scope of this tutorial.
Step 1
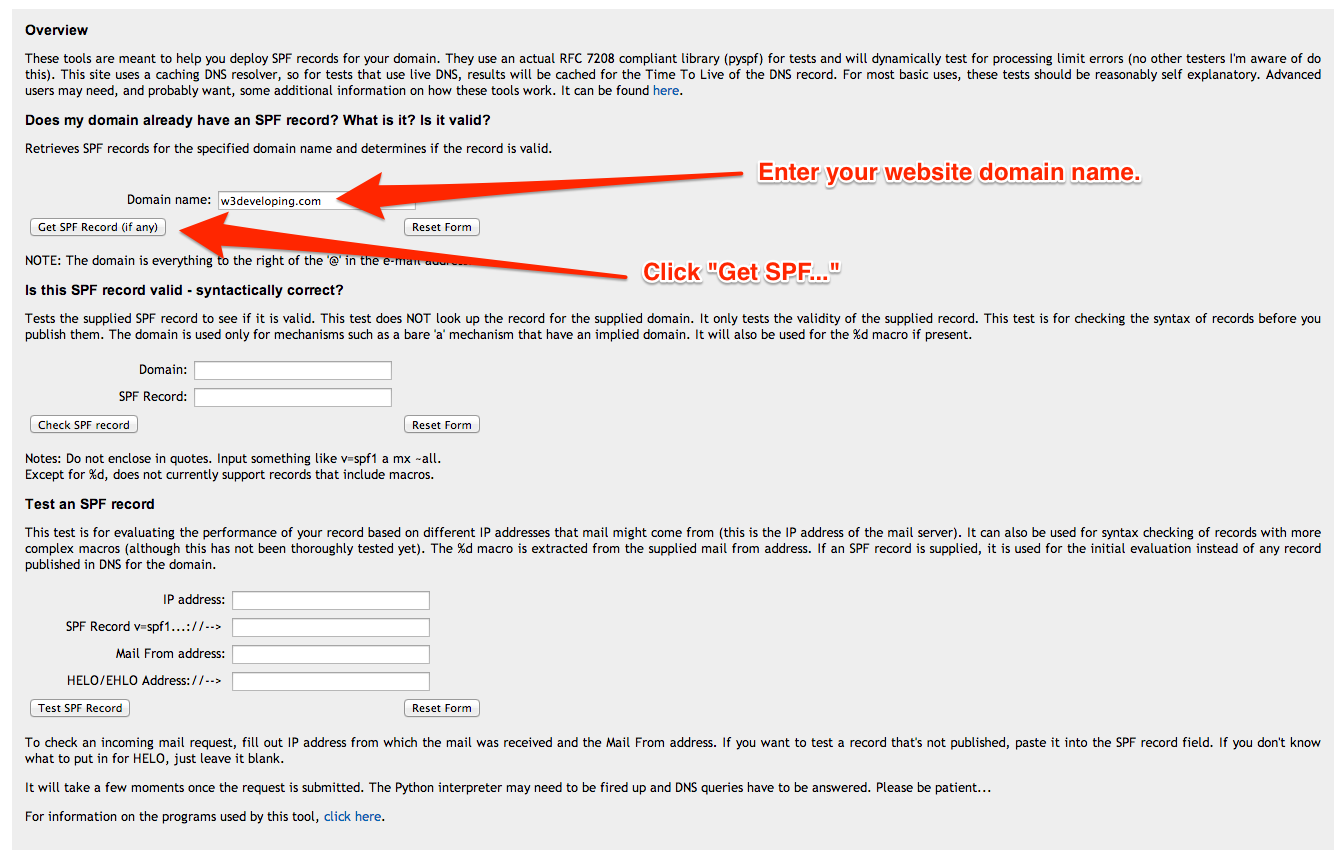
First let’s run a test: go to Test SPF Validation. Enter your domain name in the box.
[lightbox full=”https://w3developing.com/wp-content/uploads/2014/07/SPF_Query_Tool.png” title=”Test SPF Validation”]
[/lightbox]
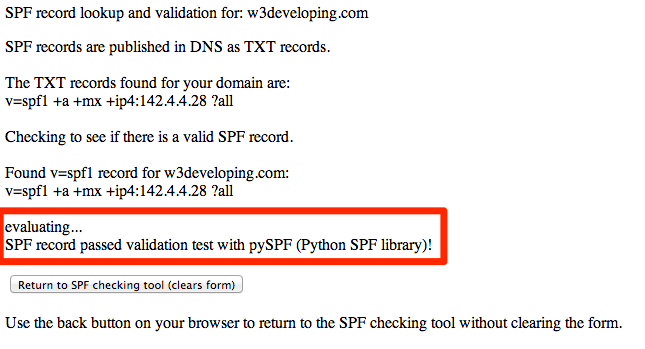
If SPF is configured and being utilized your results should show as “SPF record passed…”.
[lightbox full=”https://w3developing.com/wp-content/uploads/2014/07/www_kitterman_com_getspf2_py.png” title=”SPF Validation Status Info”]
[/lightbox]
The first test has been completed to determine the SPF response.
It should be noted this tutorial was written to support hosts that operate using cPanel. This doesn’t mean you can’t achieve the same setting modifications with another custom hosting control panel, but it just might not be exactly consistent with this tutorial. (visual images etc) cPanel is by far the most common used hosting control panel with php/MySQL driven websites such as WordPress. BlueHost, HostGator and many other hosting companies use cPanel.
More info the the SPF result. There are also several other scenarios which can be at play. For example, if the website is hosted at BlueHost and all email is routing through BlueHost servers, then you might see a BlueHost server IP address or domain name indication in the SPF results associated to BlueHost. But if email is routing through a 3rd party server such as Microsoft, the results might display an indication of Microsoft.
There are too many potential configurations to name, but keep in mind the test results above should indicate where the email is originated from.
IMPORTANT! Keep in mind when sending emails through WordPress using the native WordPress core mailer, emails originate from the server itself. This is why most often Step 2 of this process will instantly cure the problem. Very ofter SPF settings will be applied by default from the hosting company and will already be configured correctly. In this case, Step 4 can be bypassed.
Step 2
a) Open up your WordPress website administration console and login as root admin.
b) Under “Settings” examine the email address that is being displayed. This email address should match your domain name email address. For example, if your website is mywebsite.com, then the email address here must end in @mywebsite.com.
[lightbox full=”https://w3developing.com/wp-content/uploads/2014/07/General_Settings_‹_WordPress_Web_Design___Google_Services_—_WordPress.png” title=”WordPress Email Settings Should Match Domain”]

[/lightbox]
Step 3 ( IMPORTANT! The below steps will only usually apply if the core WordPress mailer is being bypassed with an SMTP Plugin )
a) Login in to your cPanel account. This can normally be accessed by going to: https://yourdomainname.com/cpanel. If not, ask your hosting provider how to access it.
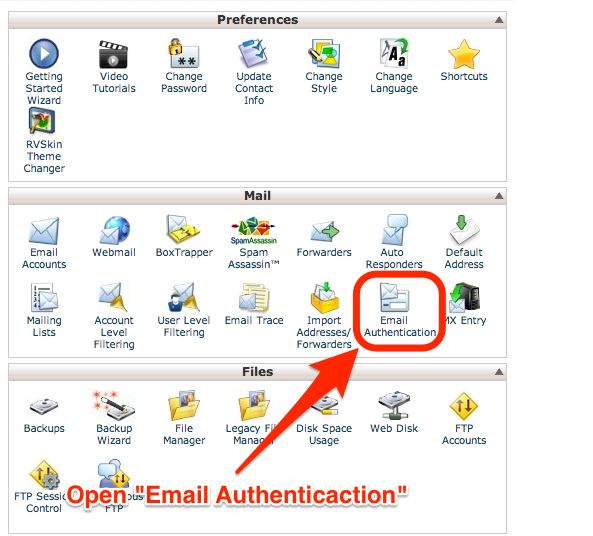
b) Click and open “Email Authentication”
[lightbox full=”https://w3developing.com/wp-content/uploads/2014/07/cPanel_X.png” title=”Login to cPanel and open Email Authentication”]
[/lightbox]
Step 4
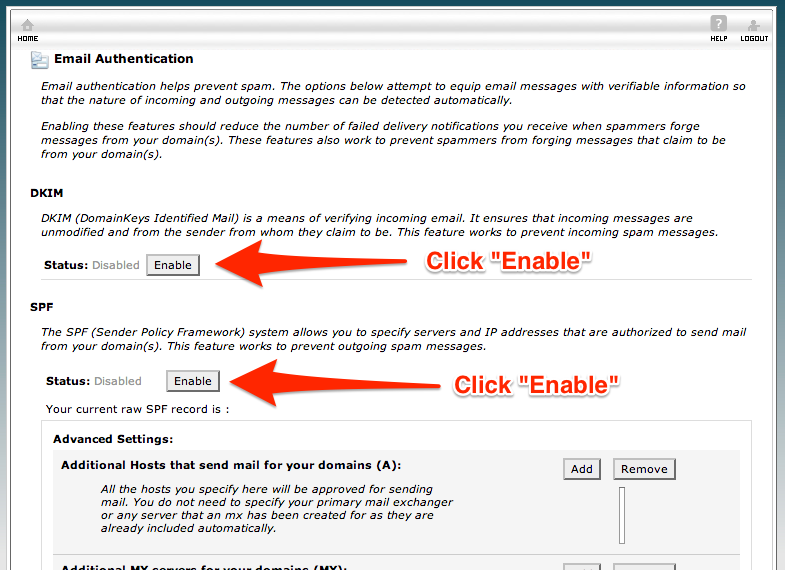
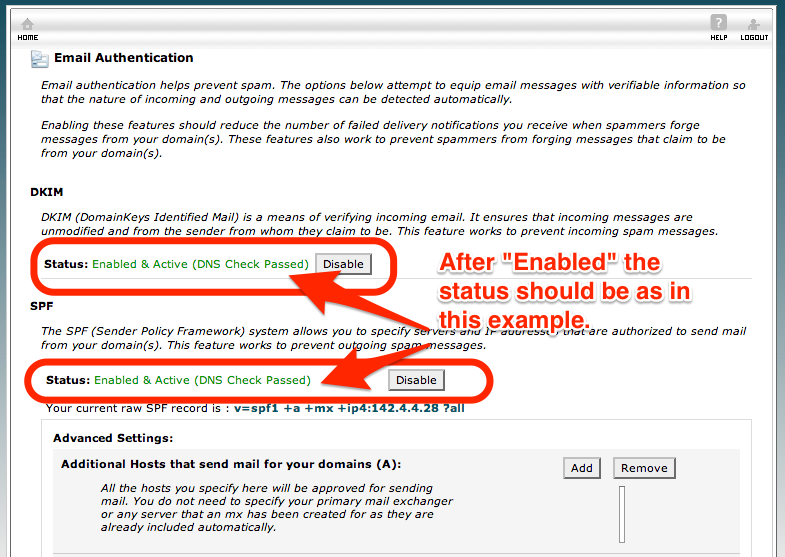
a) Enable two settings: DKIM and SPF. DKIM basically ensure the email has not been modified from it’s origination, and SPF basically verifies that the email is originating from the domain name that matches the email address.
[lightbox full=”https://w3developing.com/wp-content/uploads/2014/07/cPanel_X2.png” title=”Enable SPF and DKIM”]
[/lightbox]
b) Verify both have “Passed” DNS Authentication:
[lightbox full=”https://w3developing.com/wp-content/uploads/2014/07/cPanel_X3.png” title=”Ensure SPF and DKIM have passed DNS verification”]
[/lightbox]
Please Read! A Disclaimer of sorts.
The above is a very basic solution which may or may not solve your problem. There are a vast amount of details that can arise in relation to email, MX and DNS settings. And if the above does not work or solve the problem it could lay in other settings of WordPress, Plugin conflicts, server configuration etc.
[text-blocks id=”416″ slug=”request-a-callback”]
